Anthro Guide
This page is also available in: Deutsch, English, Espanol, Français, Italiano, Japanese, Nederlands, Polski, Portuguese
Contents |
Dragon Anthro Creation Guide.
It's possible to create very unique dragon anthro av by modifying parts from your hatchling and your wyrmling.
This tutorial is starting from scratch to having created your anthro. Please bare in mind that the parts you choose are colorable via the HUD and it's the *look* that you are picking when buying the materials, not the color. This tutorial will have some Screen Shots to provide validation that you are doing it correctly. This tutorial assumes that you know how to rotate and scale a group of prim.
Required Materials:
1. The hatchling of your choice. Bare in mind that this will be the head that you will wear. Also, bare in mind that there are a few oddly shaped hatchlings that it would be better to avoid unless you would like to be spending a few hours modifying the parts to fit. The oddly shaped hatchlings are; the Spirit Hatchling, the Bone Hatchling, and the Hydra Hatchling.
That's not to say that it is impossible to use them, however it takes considerably more work to get them to look good. You can get this for $L650 at the Cathedral in Limbo.
2. The wyrmling that you like the hind legs. We will be using the hind legs to make the legs of the Anthro. You can get this for $L2200 at the Cathedral in Limbo.
3. (optional) Malendryn Tiger's Flextail Script.
4. (optional) A set of wings.
Hatchling Head Procedure:
1. Gather materials
2. Make a new folder in your inventory in the folder where you store your AV. Call it 'Dragon Anthro'.
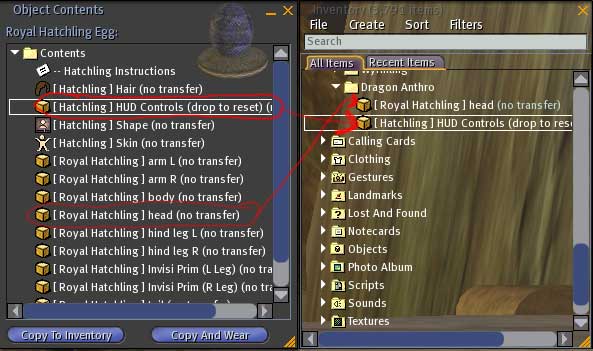
3. Rez your hatchling egg on the ground. Click it to get the contents. This will give you a new folder in your inventory with the hatchling parts and HUD.
4. From the folder the egg gave you, drag the 'head' and the 'HUD Controls', the 'Hair', both of the 'invisiprim' and the Tail to the 'Dragon Anthro' folder that you created in step 2.
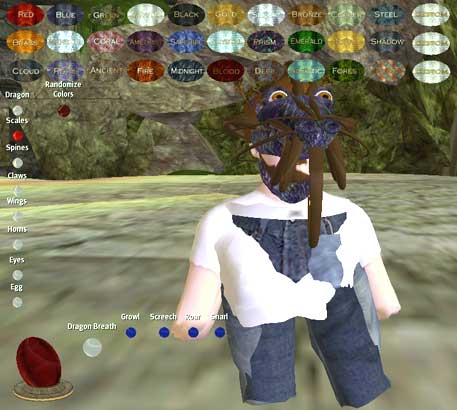
5. Wear the head, hair, tail and HUD. You will look a *crunched* as the animation overrider for the hatchling takes effect. This is ok. We'll fix this.
6. Colorize your head with the HUD to your liking. Bare in mind that the only parts that will colorize at this point are the 'Horns', 'Eyes', Spines and 'Scales'
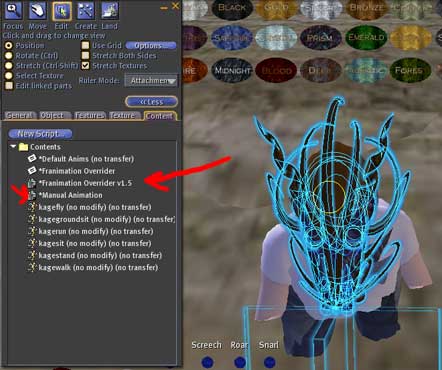
7. Right click on the hatchling head. From the Pie menu, choose Edit. Click the 'More >>' button if you see it. Then click the Content tab. In the content tab, remove the two scripts. '*Franimation Overrider v1.5' and '*Manual Animation'.
8. Close the edit box, then detach the head. Then, wear the head again. Notice how your body is not crushed anymore.
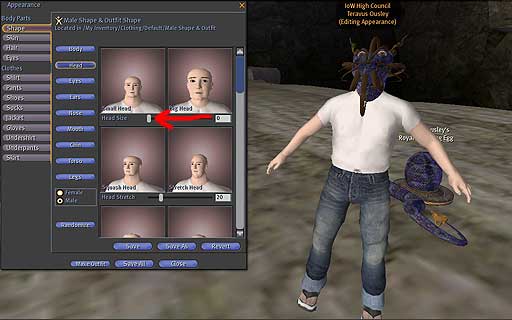
9. Edit your appearance. In the shape section, click the 'Head' Button.
10. Make the head size as small as possible. Notice now the head fits.
Wyrmling Legs Procedure
1. Rez your wyrmling egg on the ground. Click it to get the contents. This will give you a new folder in your inventory with the wyrmling parts and HUD.
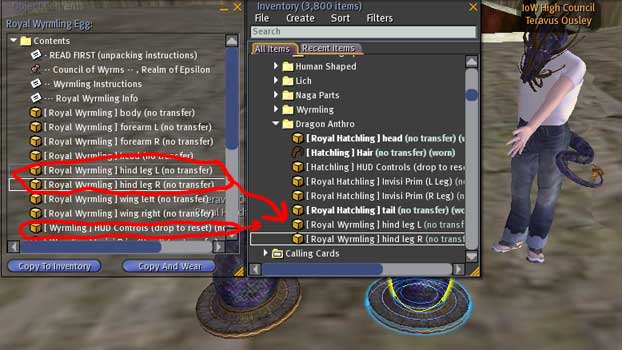
2. From the folder the egg gave you , drag the 'hind leg L' and the 'hind leg R' into the Dragon Anthro folder
3. Attach the hind leg L to the L Upper Leg. Attach the hind leg R to the R Upper Leg. To do this, right click on the
part, Choose 'Attach To >'. From the menu that pops out, click the attachment point. The legs will be rotated funny and be way too big. That's ok. We'll fix that.
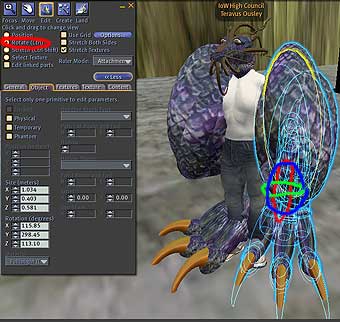
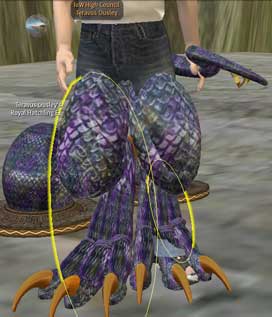
4. Right click on one of the wyrmling legs and choose edit from the pie menu. If you see a 'More >>' button, click it. Choose the Rotate radio button, and rotate the leg like shown in the screen shot. Do the same for the other leg.
5. Choose the Stretch radio button, and look for white boxes surrounding the leg. If you don't see them, try zooming your view out a bit. Shrink the legs using the white boxes surrounding the leg. You will need to re-position and will probably need to re-rotate them once you get them to the right size. Remember, the Position radio button is used for positioning, the rotate radio button is used for rotating the part and the stretch button is used for expanding and shrinking the part.
6. Wear both of the Invisiprim in the 'Dragon Anthro' folder.
7. Find and stretch the invisprim to cover the 'human' legs. This may take a bit of tweaking to have it cover the entire leg.
8. At this point, go ahead and wear the wyrmling HUD and colorize the legs to match the head.
Body Tattoo
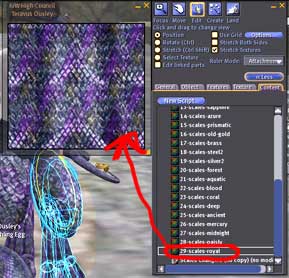
9. Click and edit one of the legs again. Go to the Content tab. Inside the contents of the leg, you will notice a bunch of textures. Find the texture that matches what you chose for the scale texture in the HUD and drag it from the leg's content, to your 'Dragon Anthro' folder.
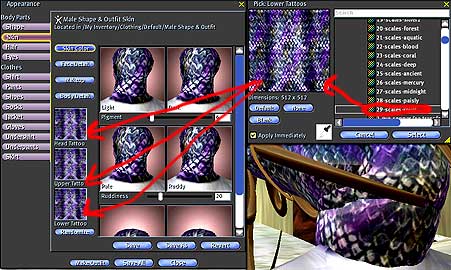
10. Edit your appearance again, and in the 'Skin' section, click the 'Skin Color' button. Click the 'X' over head tattoo. This will bring up the texture picker. Find the scale texture that you obtained in step 9. Click it, and Click the 'Select' button. Do this for the head tattoo, the upper body tattoo and the lower body tattoo.
11. Now Go ahead and take off the default SL clothes. Clothe your upper body like you would normally. Your lower body can be a bit more of a challenge to clothe. Dresses and togas usually work. Pants, on the other hand, will not work because of the invisiprim.
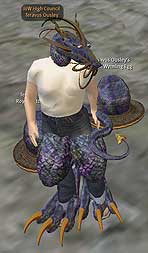
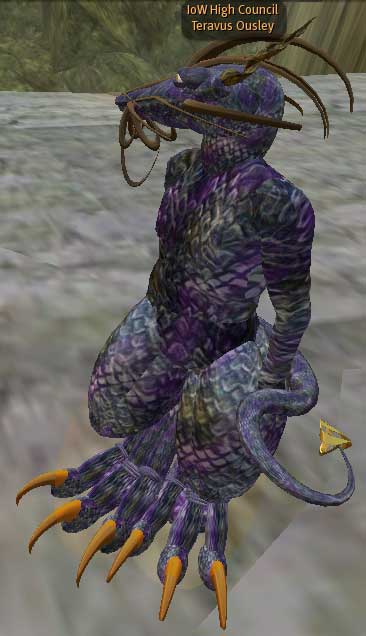
Finished Product
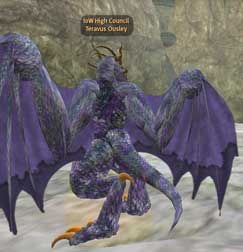
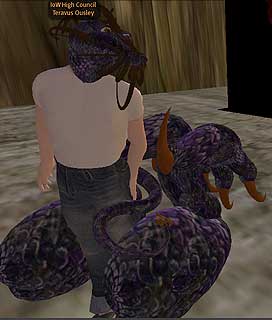
Congratulations on creating your Anthro Dragon Avatar!
(Optional) Tail procedure
1. Create a cone
2. Apply the flextail script by editing it, then dragging the flextail script into the content tab. Notice how it's moving
now. (flextail script below).
3. Texture it with the texture that we got from the wyrmling legs procedure, step 9.
4. Take the cone, then attach it to your stomach. Rotate and position it so it looks to be in a realistic place.
Melendryn's flextail script
// *Created by Malendryn Tiger* {
   default
   {
       state_entry()
       {
           llSetTimerEvent(1);
       }

       timer() {
           llSetTimerEvent(1);

           float x = llFrand(1.0) - 0.5;
           float y = llFrand(1.0) - 0.5;
           if (y > 0.357) { y = 0.357;}
           llSetPrimitiveParams(
               [
                   PRIM_FLEXIBLE, TRUE, 3, 0.3, 1.0, 0.0, 1.0, <x, y, 0.2>
               ]);

       }
   }
}
